Best Light: setting up and using it
Best Light makes you look like yourself on a good day on Zoom, Google Meet and Microsoft Teams. It works on a Mac with an Apple chip (M1 or newer) and macOS 14 Sonoma or newer.
Download and install
- Go to bestlight.ai/beta, enter your email, tick the box to agree to the beta terms, and click Email me the download.
- Open the email Your Best Light beta download and click Download Best Light. The link works for 7 days. If the email isn't in your inbox within a few minutes, look in your spam folder.
- Open your Downloads folder and double-click Best Light.dmg.
- A window opens with Best Light and an Applications folder. Drag Best Light onto Applications.
- Close the window. In the Finder's sidebar, click the eject button next to Best Light.

Best Light must be in Applications. Its camera only installs from there.
Open Best Light the first time
- Open Applications and double-click Best Light.
- macOS asks: "Best Light" is an app downloaded from the Internet. Are you sure you want to open it? Click Open.
- The Best Light window opens, and a small camera icon appears in the menu bar at the top right of your screen.
Turn on the Best Light camera
The first time, Best Light asks to add its own camera. Zoom, Teams and Meet show your look through it.
- A box says Allow the Best Light camera. Click Open System Settings.
- System Settings opens at General → Login Items & Extensions. Scroll down to Extensions.
- Next to Best Light, click the small ⓘ button.
- A panel called Best Light Extensions opens. Turn on the switch labeled Media Extension. It turns blue.
- If your Mac asks for your password, type the password you use to unlock your Mac, then click OK.
- Click Done.
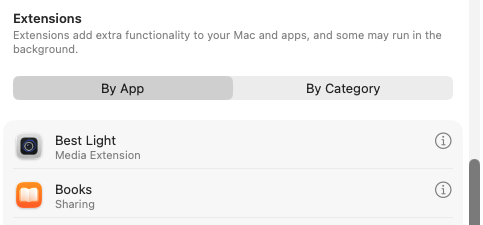
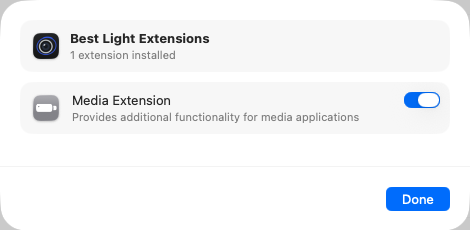
If you clicked Later, open System Settings yourself: Apple menu → System Settings → General → Login Items & Extensions, then steps 2 to 6.
Allow the camera
The first time the live filter starts, macOS asks: "Best Light" would like to access the camera. Click Allow.
If you clicked Don't Allow: Apple menu → System Settings → Privacy & Security → Camera, and turn on Best Light.
Set up my face (15 seconds, once)
Before your first call, Best Light shows Set up my face in its window.
- Sit facing your camera, with light on your face.
- Click Start.
- Follow the large words on the screen: Look at the camera, then Look down at your desk, then Look back at the camera.
- When it says Done, click Continue.
This helps your eye makeup follow your eyelids when you look down. You can click Skip for now, and do it later from the menu bar icon → Set Up My Face….
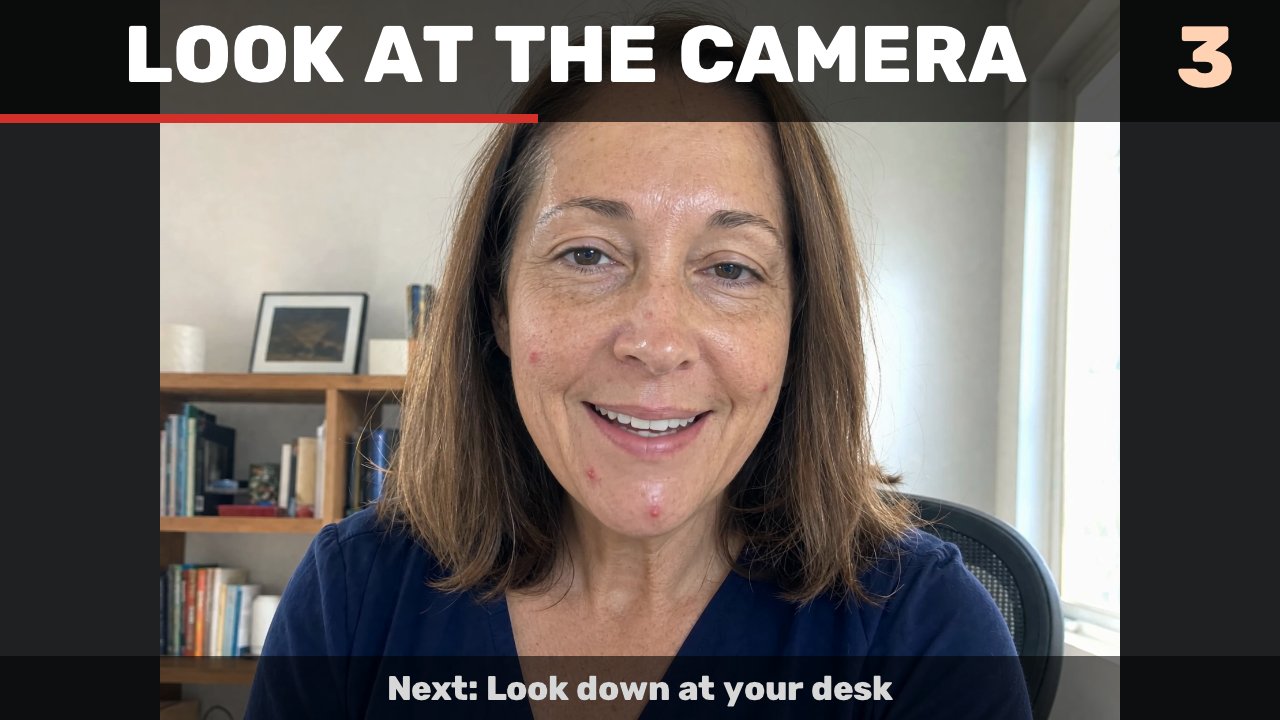
Turn the live filter on and off
- From the menu bar: click the camera icon at the top right of your screen, then Turn Live Filter On. Click it again and choose Turn Live Filter Off to stop.
- In the Best Light window: the Live Video tab shows what the call sees. Turn Look Off shows your plain camera on the call. Turn Off Camera stops the live filter.
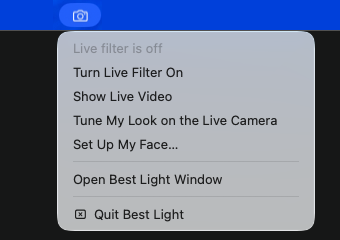
Turn the live filter on before you join a call.
Pick Best Light as your camera
If Best Light isn't in the camera list, quit the app (or the browser) completely and open it again. Apps only see a new camera after they restart.
Zoom
- Before a call: zoom.us menu → Settings → Video → Camera → Best Light.
- During a call: click the small arrow next to Stop Video at the bottom → Best Light.
Zoom shows you your own picture mirrored; other people see you the right way round.
Google Meet (in Chrome or Safari)
- Before a call: on meet.google.com, click Settings (the gear) → Video → Camera → Best Light → Done.
- During a call: click the small arrow next to the camera button at the bottom → choose Best Light.
- The first time, the browser asks to use the camera:
- Chrome: meet.google.com wants to use your camera. Click Allow.
- Safari: Allow "meet.google.com" to use your camera? Click Allow.
- If the browser itself has no camera access: Apple menu → System Settings → Privacy & Security → Camera, turn on Google Chrome or Safari, then quit and reopen the browser.
Microsoft Teams
- Before a call: click Settings and more (…) at the top → Settings → Devices → under Camera, choose Best Light.
- Before joining: on the screen before you join, open the device settings and choose Best Light.
- During a call: click the arrow next to Camera in the meeting controls → choose Best Light.
Change your look
- In the Best Light window, click Adjust My Look.
- Move a slider to the right for more, to the left for less. The picture changes.
- Click Save my look. The call changes within a second.
- Reset to natural puts every slider back to a light, natural look.
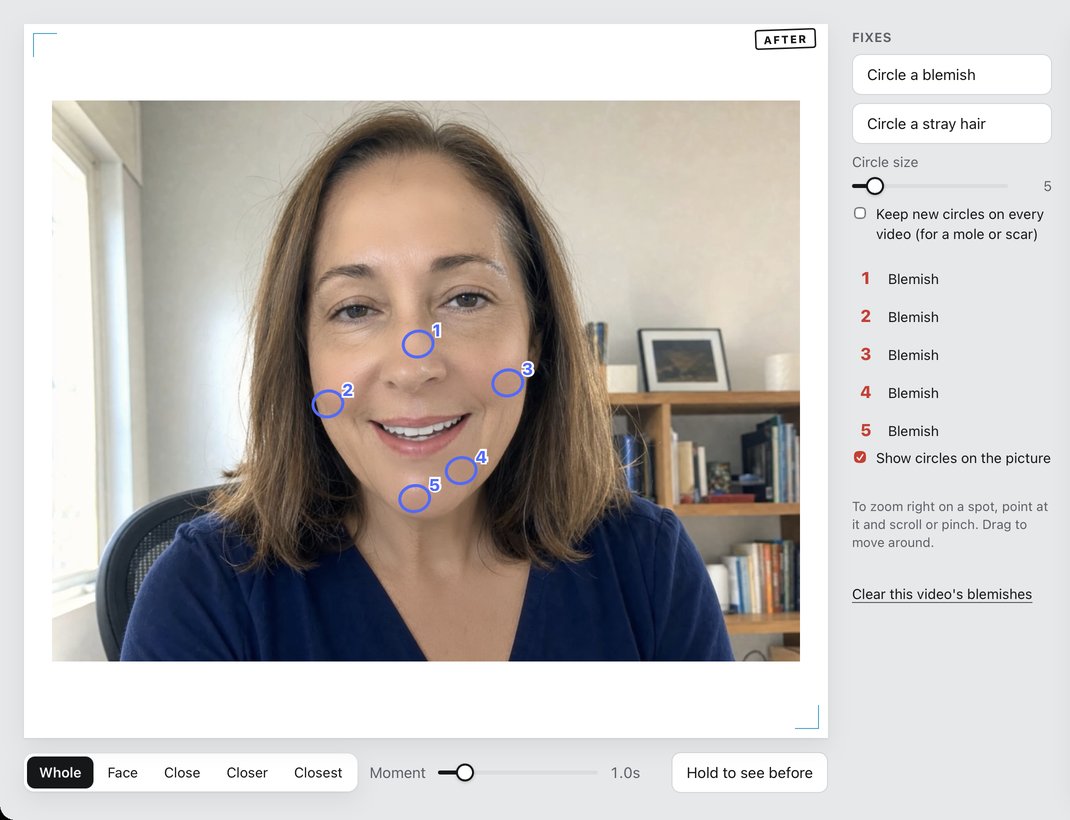
Remove a blemish: click Circle a blemish, then click the spot on your picture. A numbered circle marks it, and it stays gone on your calls. Undo last circle takes back the last one.
"Best Light is off" on the call
If people on the call see a dark card saying Best Light is off, the live filter isn't running. Turn it on from the menu bar icon (Turn Live Filter On), or pick your normal camera in the call.
If something isn't working
| What you see | What to do |
|---|---|
| Allow the Best Light camera | Do section 3 |
| Restart your Mac to finish updating, or the live filter says the Best Light camera isn't ready or didn't start | Restart your Mac. After an update, the new Best Light camera starts only after a restart |
| The Best Light camera couldn't be installed | Check that Best Light is in Applications, then quit and reopen it. If it still fails, restart your Mac |
| Restart your Mac to finish | Restart your Mac. The Best Light camera is ready after that |
| Best Light isn't allowed to use the camera | Click Open System Settings and turn on Best Light under Camera |
| The camera is blocked | Apple menu → System Settings → Privacy & Security → Camera, turn on Best Light |
| Camera not available | Close FaceTime, Photo Booth or another app using the camera, then turn the live filter on again |
| No camera found | Plug your camera in, or check Privacy & Security → Camera |
| The camera picture froze: restarting the camera. | Wait a few seconds. Best Light restarts the camera by itself |
| Camera disconnected. | Your camera stopped (unplugged, or your iPhone moved away). Plug it back in and turn the live filter on again |
| The live filter stopped | Read the reason in the box, fix it with this table, then turn the live filter on again |
| The Best Light camera isn't installed | Do section 3 |
| The Best Light camera didn't start | Quit Best Light and open it again |
| Best Light can't start | Download Best Light again and drag it to Applications |
| The call shows Best Light is off | See section 9 |
| Best Light isn't in the call's camera list | Quit the call app or browser completely and open it again |
| A black picture on the call | Turn the live filter on, or pick Best Light again in the call's camera list |
Uninstall Best Light
- Click the menu bar icon → Turn Live Filter Off, then quit Best Light (Best Light menu → Quit Best Light).
- Turn off the camera: Apple menu → System Settings → General → Login Items & Extensions → Extensions → ⓘ next to Best Light → turn the switch off → Done.
- Drag Best Light from Applications to the Trash.
- Best Light's files stay on your Mac until you delete them. In the Finder, choose Go → Go to Folder…, type each of these, and drag what it shows to the Trash:
~/Library/Application Support/Best Light(your look, clicked blemishes, your face set-up)- Any
.spots.jsonor.hairs.jsonfiles next to videos you opened in Best Light ~/Library/Logs/Best Light.log(the app's log)~/Library/Preferences/ai.bestlight.BestLight.plist(the app's settings)~/Library/WebKit/ai.bestlight.BestLight(how you like the slider page laid out)
- Empty the Trash.